New User Guide
HIBU (Slurm HPC)
Cluster details
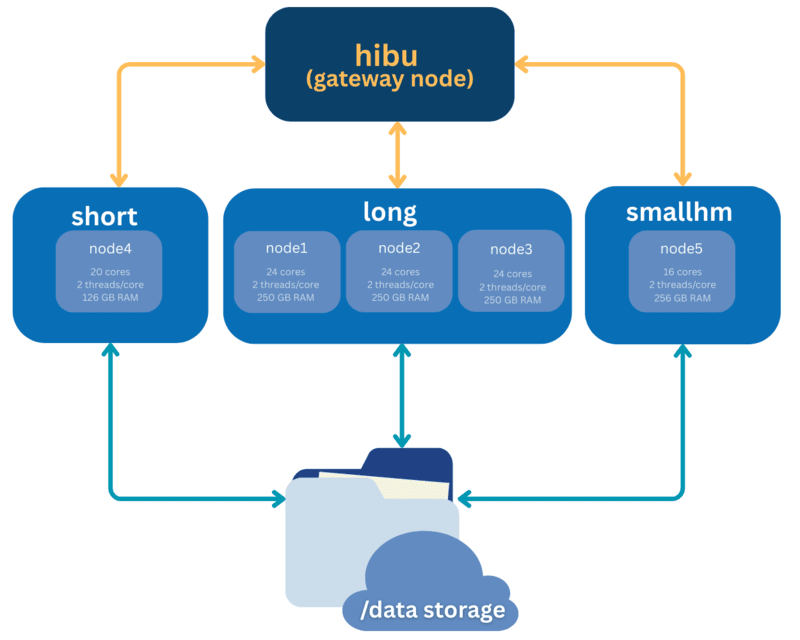
HIBU is a high-performance computing (HPC) system consisting of four compute nodes organized into two partitions. Job scheduling is managed by the Slurm scheduler. A dedicated head (login) node allows users to prepare scripts, submit/cancel jobs, and transfer data. HIBU uses a NAS with a total capacity of up to 42 TB.
- Cluster name: HIBU
- Login hostname: hibu.imbb.gr (NOT imbb.forth.gr) or 139.91.75.141 (VPN needed, outside IMBB/FORTH network)
- Default partition: long
- Available partitions: long, short, smallhm
- Total number of nodes: 4
- Filesystems:
- HOME: /home/{USER}/
- SCRATCH: /data/{USER}/ Total Capacity: 42TB
- Containers: singularity
- Data transfer options: scp, rsync, FTP, wget, curl
- Support contact: hpc-support@imbb.forth.gr
- Docs page: TBD
Partitions
| long | short | smallhm |
|---|---|---|
|
|
|
1. Access & First Login
If you do not own an account:
- Request an account: Send an e-mail to request a new account. Provide affiliation, intended workloads, software needs.
- Set up VPN: Connect to IMBB VPN to be able to access HIBU through SSH.
- Download Google Authenticator on your smartphone and scan the QR code you have received from the administrator upon your account creation.
If you already own an account:
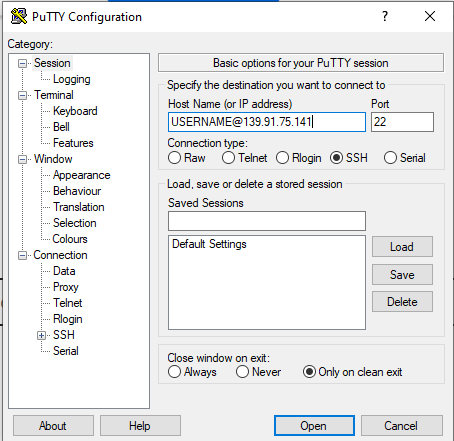
Windows users
- Download PuTTY on your personal computer,
- Connect to IMBB VPN (when you are out of office)
- Fill in your username, correct hostname/IP and port to PuTTY (as shown in the figure).
- When you are connected, you will be asked to type your password and a verification code from Google Authenticator on your smartphone.
Linux/iOS users
For Ubuntu/Debian/IOS: Open the console application
Type ssh [my-username]@139.91.75.141
When you are connected, you will be asked to type a code from Google Authenticator on your smartphone.

You are currently connected to the cluster’s head node. This node is not for running analyses; use it only to prepare jobs, data, and scripts. Running intensive workloads here can disrupt or crash the gateway that all users rely on to access the cluster. Submit analyses through the scheduler from compute nodes only.

2. Filesystems & Data Storage
- $HOME: /home/{{USER}} -- small, for configs & scripts, not backed up.
- SCRATCH: /data/{{USER}} -- fast, not backed up.
Data transfers
- Transfer to or from HIBU: scp or rsync -avP local/ {user}@{{DATA_HOST}}:/data/{{USER}}/
- wget or curl,
- Or an FTP client
3. SLURM Job Scheduler
3.1 Introduction
Slurm is an open source, fault-tolerant, and highly scalable cluster management and job scheduling system for large and small Linux clusters. Slurm requires no kernel modifications for its operation and is relatively self-contained. As a cluster workload manager, Slurm has three key functions. First, it allocates exclusive and/or non-exclusive access to resources (compute nodes) to users for some duration of time so they can perform work. Second, it provides a framework for starting, executing, and monitoring work (normally a parallel job) on the set of allocated nodes. Finally, it arbitrates contention for resources by managing a queue of pending work.
3.2 Commands you will use a lot
User tools include srun to initiate jobs, scancel to terminate queued or running jobs, sinfo to report system status, squeue to report the status of jobs, and sacct to get information about jobs and job steps that are running or have completed. There is an administrative tool scontrol available to monitor and/or modify configuration and state information on the cluster.
- sinfo: you get a list/report of the current status of all partitions and nodes
- squeue: you get a list/report of all the currently running jobs
- sbatch <my_script_name>: you submit your script in order to start a new job
- scancel <jobid>: you can cancel any of the running jobs you own. Run squeue to find your job id
Arguments:
- Partition: different queues (e.g., long).
- Node/Task/CPU allocations: --nodes, --ntasks, --cpus-per-task.
- Memory allocation: --mem=8G (per node) or --mem-per-cpu=4G.
- Job array: Many similar tasks: --array=1-100%10.
You can find more documentation for SLURM scheduler at: https://slurm.schedmd.com/documentation.html
3.3 Basic types of jobs
A) Single Node: serial (1 core) or multicore (>1 cores)
You can request only a 'slice' of a node, leaving space for other users to utilize the remaining resources of a node. To achieve this, you should specify both the number of cores you need and the corresponding memory (RAM). See example below:
#!/bin/bash
#SBATCH --name=”hello”
#SBATCH --partition=long
#SBATCH --nodes=1
#SBATCH --cpus-per-task=1       	# binds only 1 core out of the available
#SBATCH --mem=2G		# binds only 2GB out of the available
#SBATCH -o slurm-%j.out

python myscript.py --input /data/{{USER}}/data/input.dat --out  /data/{{USER}}/results/out.txt
If you need to bind the entire node, you could omit flags in bold. SLURM will automatically bind the entire node to your job.
B) Multinode: Job array
If your type of analysis allows to split your input data into chunks and process them separately, you can use the following example to create multiple jobs at once either in the same node or across different nodes of the same partition.
#!/bin/bash
#SBATCH --name="jobarray"
#SBATCH --partition=long
#SBATCH --nodes=1			# or more
#SBATCH --cpus-per-task=1	# binds 1 core out of the available for each chunk
#SBATCH --mem=2G		# binds 2GB of RAM for each chunk
#SBATCH --array=1-10		# 10 chunks
#SBATCH -o logs/array_%A_%a.out

PARAMS=$(sed -n "${SLURM_ARRAY_TASK_ID}p" params.txt)

python simulate.py $PARAMS --seed ${SLURM_ARRAY_TASK_ID} --out results/${SLURM_ARRAY_TASK_ID}.json
C) Dependencies (run B after A finishes OK)
jid1=$(sbatch jobA.slurm | awk '{print $4}')
sbatch --dependency=afterok:${jid1} jobB.slurm
3.4 How to request the right resources
- Time: Be realistic; shorter jobs start sooner. Use previous sacct records to calibrate.
- CPUs: For pure Python/R without native threads, 1-2 CPUs are often enough. Use OpenMP (--cpus-per-task) or MPI (--ntasks) when your code supports it.
- Memory: Start modestly; validate with MaxRSS from sacct and adjust.
- Nodes vs tasks:
- Single-node shared memory: -N 1 --cpus-per-task=X.
- Multi-node MPI: -N N --ntasks-per-node=T.
Pro tip: Avoid --exclusive unless you truly need the whole node; it reduces throughput and priority.
3.5 Monitoring & Logs
- Queue & nodes: sinfo, squeue -u $USER.
- Inspect a job: scontrol show job <jobid>.
History & usage:
sacct -j <jobid> --format=JobID,JobName%20,Partition,State,Elapsed,Timelimit,AllocTRES%30,ReqMem,MaxRSS,ExitCode
Logs
Stdout/stderr go to slurm-%j.out by default; customize with -o and -e.
3.7 Best Practices & Etiquette
- Develop small, run big: Test with tiny inputs first; scale after validation.
- Keep environments portable: Script your python envs / conda activate steps in the job file.
- Avoid HOME I/O: Use /data for read/write workloads.
- Clean up SCRATCH: copy results you need back to a personal storage locally.
- One process per CPU unless threaded: Don’t oversubscribe.
- Version control: Keep job scripts in your personal Git account; include --version outputs in logs.
- Cite the cluster: Use {{CITATION_TEXT}} in publications.
- Write heavy outputs to SCRATCH filesystem.
- For long runs, implement checkpointing so jobs can resume.
3.8 Troubleshooting
- Job stuck in PD: Check squeue reason; reduce resources; try another partition; verify account/QoS.
- Exceeded memory: Increase --mem (or --mem-per-cpu), review MaxRSS, fix memory leaks.
You can send us an e-mail for troubleshooting if you face issues running your job at: hpc-support@imbb.forth.gr, including: jobID(s), script(s), slurm-<jobid>.out, pathways to your scripts, and a minimal reproducer if possible.
3.9 Policy Highlights
- Login/Head node usage: Short, lightweight tasks only. No heavy CPU/GPU jobs.
- Data retention: SCRATCH purged after {{SCRATCH_PURGE_DAYS}} days.
- Backup: No backup is performed due to lack of resources. The user is fully responsible to keep copies of their files regularly.
- Sensitive data: Guidelines for HIPAA/GDPR/IRB as applicable: according to IMBB/FORTH’s regulations.
3.10 Quick Reference (Cheat Sheet)
| Task | Command |
|---|---|
| Submit job | sbatch job.slurm |
| Live queue | squeue -u $USER |
| Job details | scontrol show job <jobid> |
| Cancel job | scancel <jobid> |
| Node/partition info | sinfo -o '%P %a %l %D %C %G %F' |
| Interactive alloc | salloc -p {{DEFAULT_PARTITION}} -t 02:00:00 --cpus-per-task=4 --mem=8G |
| Array job | #SBATCH --array=1-100%10 |
| Account/QoS | #SBATCH -A {{SLURM_ACCOUNT}} / #SBATCH --qos={{DEFAULT_QOS}} |
| Efficiency | seff <jobid> (if available) |
3.11 Templates (copy & adapt)
Minimal job script
#!/bin/bash
#SBATCH --name="hello"
#SBATCH --partition=long
#SBATCH --nodes=1
#SBATCH --cpus-per-task=1       	# binds only 1 core out of the available
#SBATCH --mem=2G		# binds only 2GB out of the available
#SBATCH -o slurm-%j.out

python myscript.py --input /data/{{USER}}/data/input.dat --out  /data/{{USER}}/results/out.txt
Conda in job
If you have installed any tool on your account through CONDA environments
#!/bin/bash
#SBATCH -J py
#SBATCH -A {{SLURM_ACCOUNT}}
#SBATCH -p {{DEFAULT_PARTITION}}
#SBATCH --cpus-per-task=2
#SBATCH --mem=8G

conda activate ENVIRONMENT_NAME	# env should always be reactivated
mafft --help 	# then call the tool installed within the env
Singularity
To download and convert Docker images into Singularity container:
#!/bin/bash
#SBATCH --name=”containers”
#SBATCH --partition=short
#SBATCH --nodes=1
#SBATCH --cpus-per-task=1
#SBATCH --mem=32G

singularity pull docker://staphb/mafft:latest # this creates a file named "mafft_latest.sif"
To download and convert Docker images into Singularity container:
#!/bin/bash
#SBATCH --name=”containers”
#SBATCH --partition=short
#SBATCH --nodes=1
#SBATCH --cpus-per-task=1
#SBATCH --mem=32G

singularity exec ./mafft_latest.sif mafft --help # To execute a command from the container
singularity run ./mafft_latest.sif # To run the container script
For more information on how to use Singularity you can see https://docs.sylabs.io/guides/latest/user-guide/.